Creating New Posts in Nikola
Creating New Posts in Nikola
It's important to learn this so you're using the proper workflow. If you create a new post outside of the command line, your posts won't be properly formatted and won't be able to be published.
Step 1: Open the Command Line
Assuming you're using VSCode, open the command line by pressing Ctrl + Shift + P and typing Terminal: Create New Integrated Terminal. This will open a new terminal in the bottom of your VSCode window.
Step 2: Navigate to the Posts Directory
In the command line, type cd posts and press enter. This will navigate you to the posts directory if you're not already there.
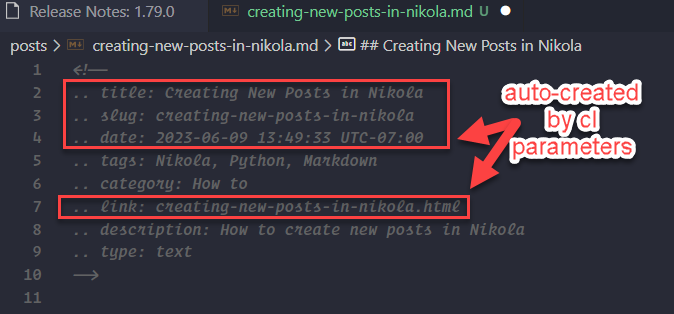
Step 3: Create a New Post
If you're creating a markdown file, type nikola new_post -f markdown -t "Your Post Title" and press enter. If you're creating a Jupyter notebook, type nikola new_post -f ipynb -t "Your Post Title" and press enter.
Step 4: Edit Your Post
Your post will be created in the posts directory. Open it up and confirm the values at the top. You may need to set the category, description, and tags values.
Step 5: Publish Your Post
If you're using Github + Netlify ci/cd like I am, you can publish your post by pushing your changes to Github - but first be sure to build it locally and test it!
Note: You can use
nikola build --cleanto build and clean at the same time - do this if you find that the static file is not updating correctly in Nikola.
Open your command line tool and run the following commands:
-
Make changes to your Nikola site
For example, create or edit posts. -
Build the static site
Run the following command in your terminal:nikola build -
Start a local web server
Run the following command in your terminal:nikola serve -
Preview the site in your web browser
Go to http://localhost:8000 or the address shown in your terminal. -
Stop the local web server
Usually by pressingCtrl+Cin the terminal. -
Add the changes to Git
Run the following command in your terminal:git add . -
Commit the changes with a message
Run the following command in your terminal, replacing "Your meaningful commit message" with a description of the changes:git commit -m "Your meaningful commit message" -
Push the changes to the remote Git repository
Run the following command in your terminal:git push origin main
That's it! You've created and published a new post in Nikola.
Created this static site with Nikola
How I learned to build this site
This week I launched dev.lukewalsh.net. I faced many challenges along the way. In this post, I'll walk you through my journey, highlighting the challenges and solutions I encountered.
First - the reason why I didn't choose WordPress
I'm very familiar with WordPress and could have easily set up this site much more quickly via WordPress. Here's why I decided against WordPress:
- WordPress is bloated with unneccessary files, CSS, but especially Javascript.
- While running a WordPress site through Cloudflare will make it load as fast as possible, it doesn't come close to the 98-100 lighthouse score to be acheived with SSGs.
- The SEO benefits of SSGs is off the charts. No WordPres plugin will ever fully replicate what can be done with a well optimized static site.
- There's no WordPress installation I know of that automatically displays Jupyter Notebooks in a very seamless way. Plenty of Python-based SSGs do.
- I want to learn how to build a relatively flat front-end with CI/CD (continuous deployment), use python to store/manage data, and separate front-end from back-end development.
Challenge #1: Finding the Right Solution (2.5 hours)
Initially, I had limited knowledge about static site generators (SSGs). After reviewing many options, including those suggested by my new developer friend, Nick, I decided to go with Eleventy, a node-based SSG with a very active community and some great templates.
I found a template replicating the Jekyll-based "Chirpy" theme, but it didn't look or behave as nicely as the original that used Jekyll. This led me to switch to Jekyll and that rabbit hole ran deep!
Challenge #2: Installing my first SSG {Jekyll} (3.5 hours)
Jekyll is built on Ruby, which I know absolutely nothing about. Getting it installed correctly was very challenging. My lack of knowledge about virtual environments and uncertainty about which hosting service to use made the process even more difficult. Let's not even get into what it's like to push from a Windows machine and pull to a Macbook. Despite these challenges, I pushed through and tried to learn as much as I could about Jekyll.
Just in time to get even more confused by CI/CD, which, ironically, is the most basic of concepts. And brilliant - everyone should deploy this way.
That's ok because environments were about to stop me in my tracks.
Challenge #3: Environment headeaches (4 hours)
I was initially unfamiliar with continuous deployment options and how they automatically build when detecting changes on GitHub. My attempts to maintain virtual environments in a .gitignore file while fantasizing that somehow I could sync unrelated, completely different virtual envronments between a PC and Mac further complicated my life.
For the unfamiliar - if you have a Windows machine you can't just use Windows PowerShell or Bash and call it a day. Oh no, that would be too logical.
You have to do this: 1. Install Linux - either Debian or Ubuntu. I chose Debian though I'm not sure why. Ubuntu seems to be more popular. You get it from the Microsoft store. As an APP. lol. 2. Open your new Linux shell and begin the long process of installing python and any necessary virtual environment software that you've already installed via Bash. You see, the Bash packaged with Windows doesn't actually work with Windows. I know, I know. 3. Go into VSCode and make sure you select WSL as your default Terminal. This is a PIA and at some point I'll circle back on this and explain why. 4. Only use WSL and keep your life incredibly simple. I love the new Microsoft, but it's never been a company focused on simplifying and has a long way to go.
Challenge #4: Choosing the Right SSG (3 hours)
A week into my exploration, I had a conversation with Nicolas, who asked what programming language I was most familiar with. When I responded with Python, he suggested finding a Python-based SSG. After some research, I discovered Nikola, which emulates Pelican and offers great flexibility. This allowed me to write in Markdown, easily display Jupyter notebooks, and leverage the power of reStructuredText.
Challenge #5: Deployment (5.5 hours)
Now that I realized I didn't need to fuss so much with environments, I could just deploy.
If only it were that simple.
First I tried Cloudflare pages. It hated Nikola, my little environment subdirectory, and just about everything I did. For some reason it worked great with Eleventy and Jeykll - even without obvious requirements.txt files. I have no idea why.
Nick had pointed out during our last meet up that Netlify is a consistently good choice for any SSG package deployments. So I chose Netlify.
This was before I knew anything about package documentation and how it tells these deployment servers which packages/versions they need to include. Most SSGs dont' create these deployment reference files by default, so PIP and ChatGPT came to my rescue.
OpenAI told me to use pip freeze > requirements.txt to provide this information to deployment servers. Boom!
Once I was able to deploy it locally, to github, and live in Netlify, I played around with the design and (nearly) matched my site header at lukewalsh.net. I'll probably tweak both sites just a bit, but my primary concern is building more content, not design issues. dev.lukewalsh.net will focus on technical content, lukewalsh.net will explain services and focus on general lead capture for consulting and freelance work.
Conclusion
In conclusion, I've been very happy with Nikola. I hope to contribute to its development in the future. There are many automation possibilities and ways to incorporate Python, and I'm excited to tackle the next challenge.
Thanks again to Chris S. and Nick C for your great advice and our motivating discussions!